In this guide I will be explaining how to deploy the VMware Tools application via Intune. VMware Tools is a suite of utilities and drivers that enhance the performance and management of virtual machines (VMs) running on VMware virtualization platforms. It provides improved graphics performance, better mouse handling, synchronized time between host and guest, and smooth file transfers between them. Additionally, VMware Tools enable advanced features like shared folders, seamless clipboard operations, and more efficient VM management.
To simplify the deployment of the application, I will be creating a dynamic group in Intune. This will automatically add virtual machine devices to the group based on the model.
For the purpose of this guide I have created the following folder structure for ease of use:
Microsoft Win 32 Content - This is where the IntuneWinAppUtil is located.
-> source
  -> {application name} - This is where the downloaded .msi or .exe files are located.
-> output
  -> (application name) - This is where the created .intunewin file is stored.
Creating the dynamic group
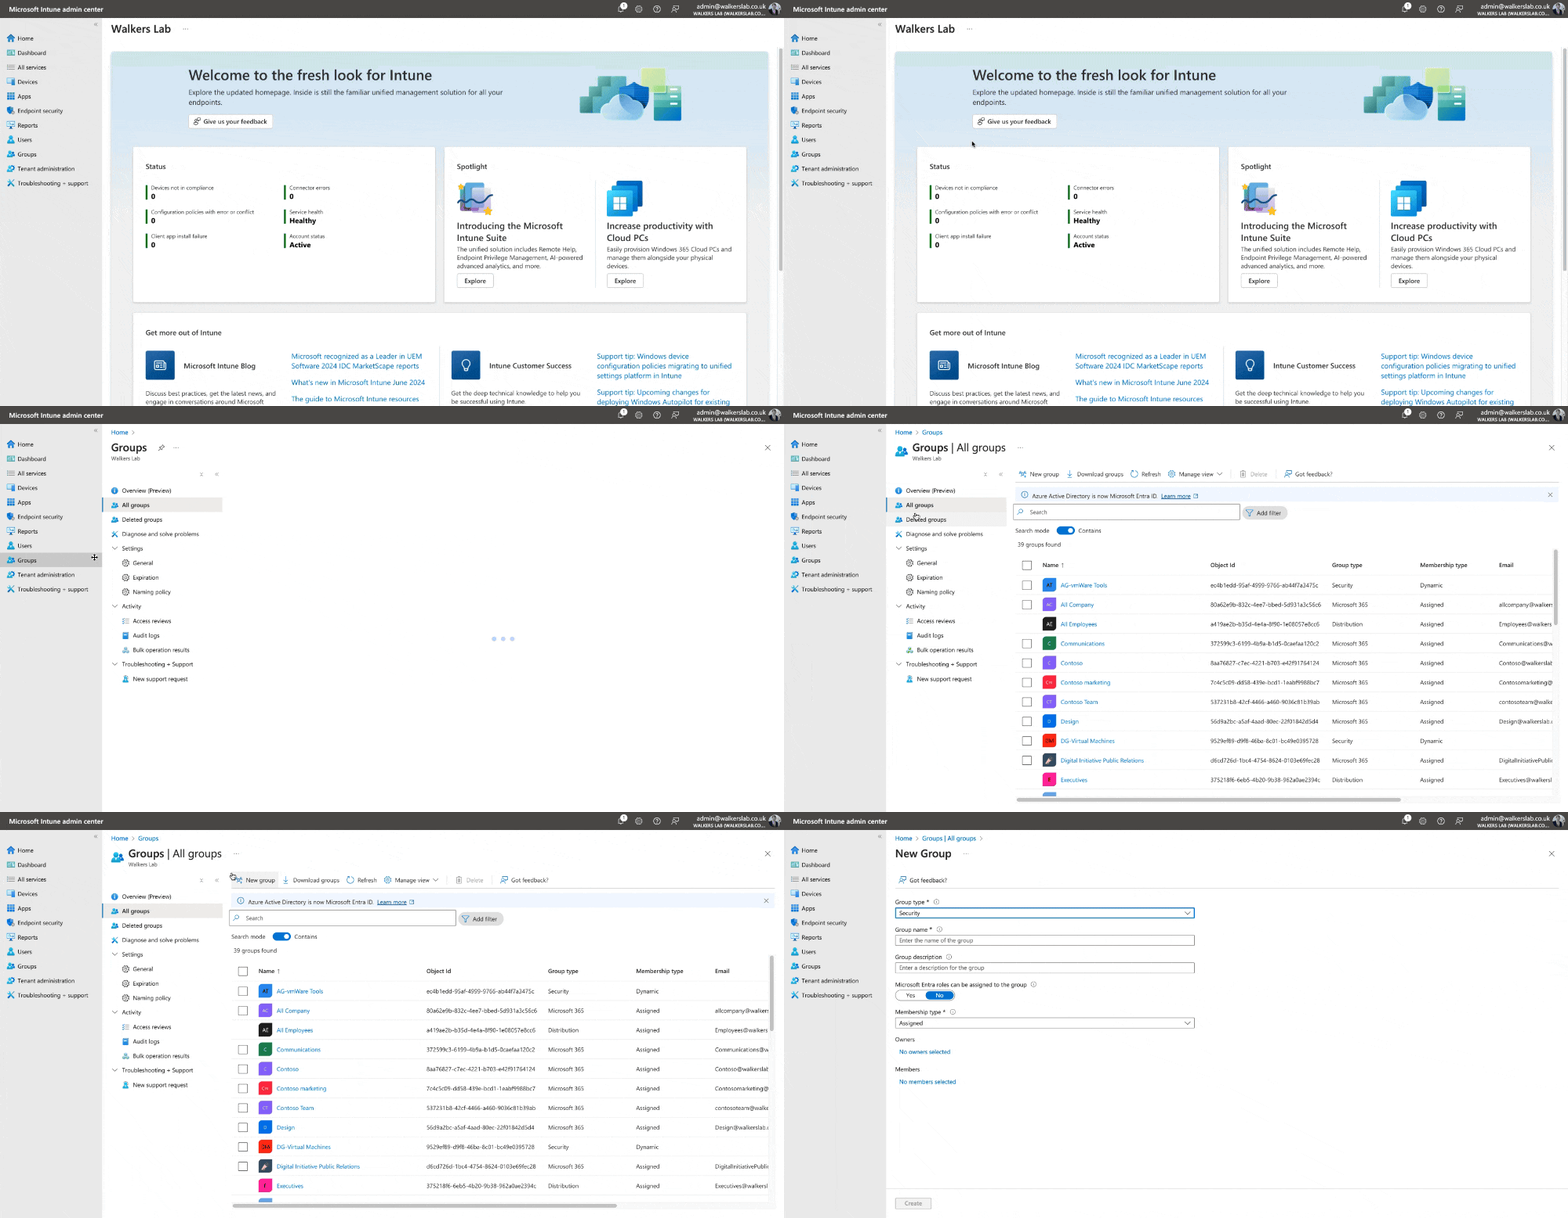
Sign in to the Intune admin center > Groups > All groups > New group

You’ll then need to fill out the properties for the group.
Group type: Security
Group name: A name for the group e.g. DG-Virtual Machines
Group description: A description for the group e.g. This group contains virtual machines devices only.
Membership type: Dynamic Device
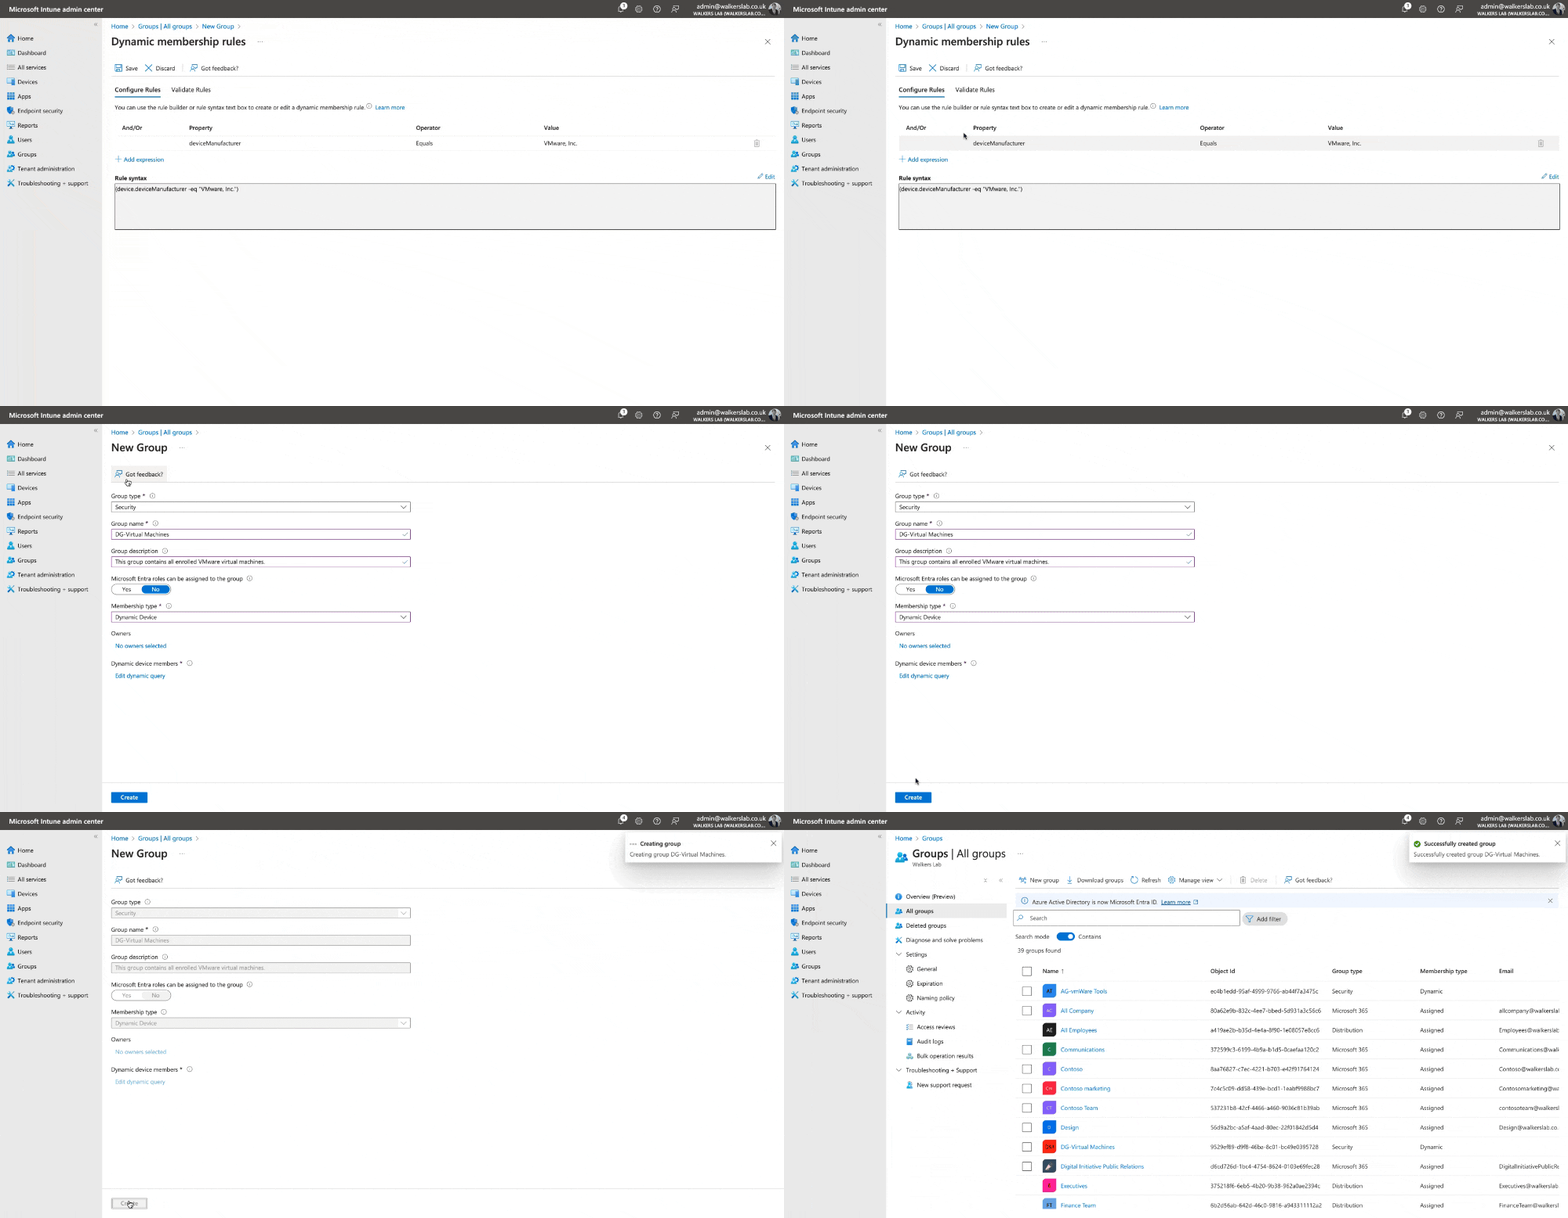
Then click on “Add dynamic query”.

On the Dynamic membership rules page, click on “Edit“.

The following syntax will identify devices by the model of Virtual Machine, VMware Virtual Platform or if the model starts with VMware:
(device.deviceModel -eq "Virtual Machine") or (device.deviceModel -eq "VMware Virtual Platform") or (device.deviceModel -startsWith "VMware")Copy and paste the syntax into the box then click on “Ok“.

Finally click on “Save” then “Create“.
The dynamic group has now been created, Intune will begin adding all VMware/Virtual Machine devices to the group.

Creating an IntuneWin file
Download vmWare Tools from: https://packages.vmware.com/tools/esx/latest/windows/x64/
Once the installer has been downloaded, move it into a folder of your choosing.
In my example it will be saved to C:\Users\Admin\Desktop\Microsoft Win32 Content\output\VMware Tools
Next launch the “IntuneWinAppUtil.exe” application as Administrator.
The Microsoft Win32 Content Prep Tool can be downloaded from https://github.com/microsoft/Microsoft-Win32-Content-Prep-Tool

Enter the specific information for where your setup files are located and where you want the .intunewin file to be outputted to.
In my example it’s the following information:
| Source Folder | C:\Users\Admin\Desktop\Intune App Creator\source\VMware Tools |
| Setup File | C:\Users\Admin\Desktop\Intune App Creator\source\VMware Tools\VMware-tools-12.4.0-23259341-x86_64.exe |
| Output Folder | C:\Users\Admin\Desktop\Intune App Creator\output\VMware Tools |
| Catalog | N |

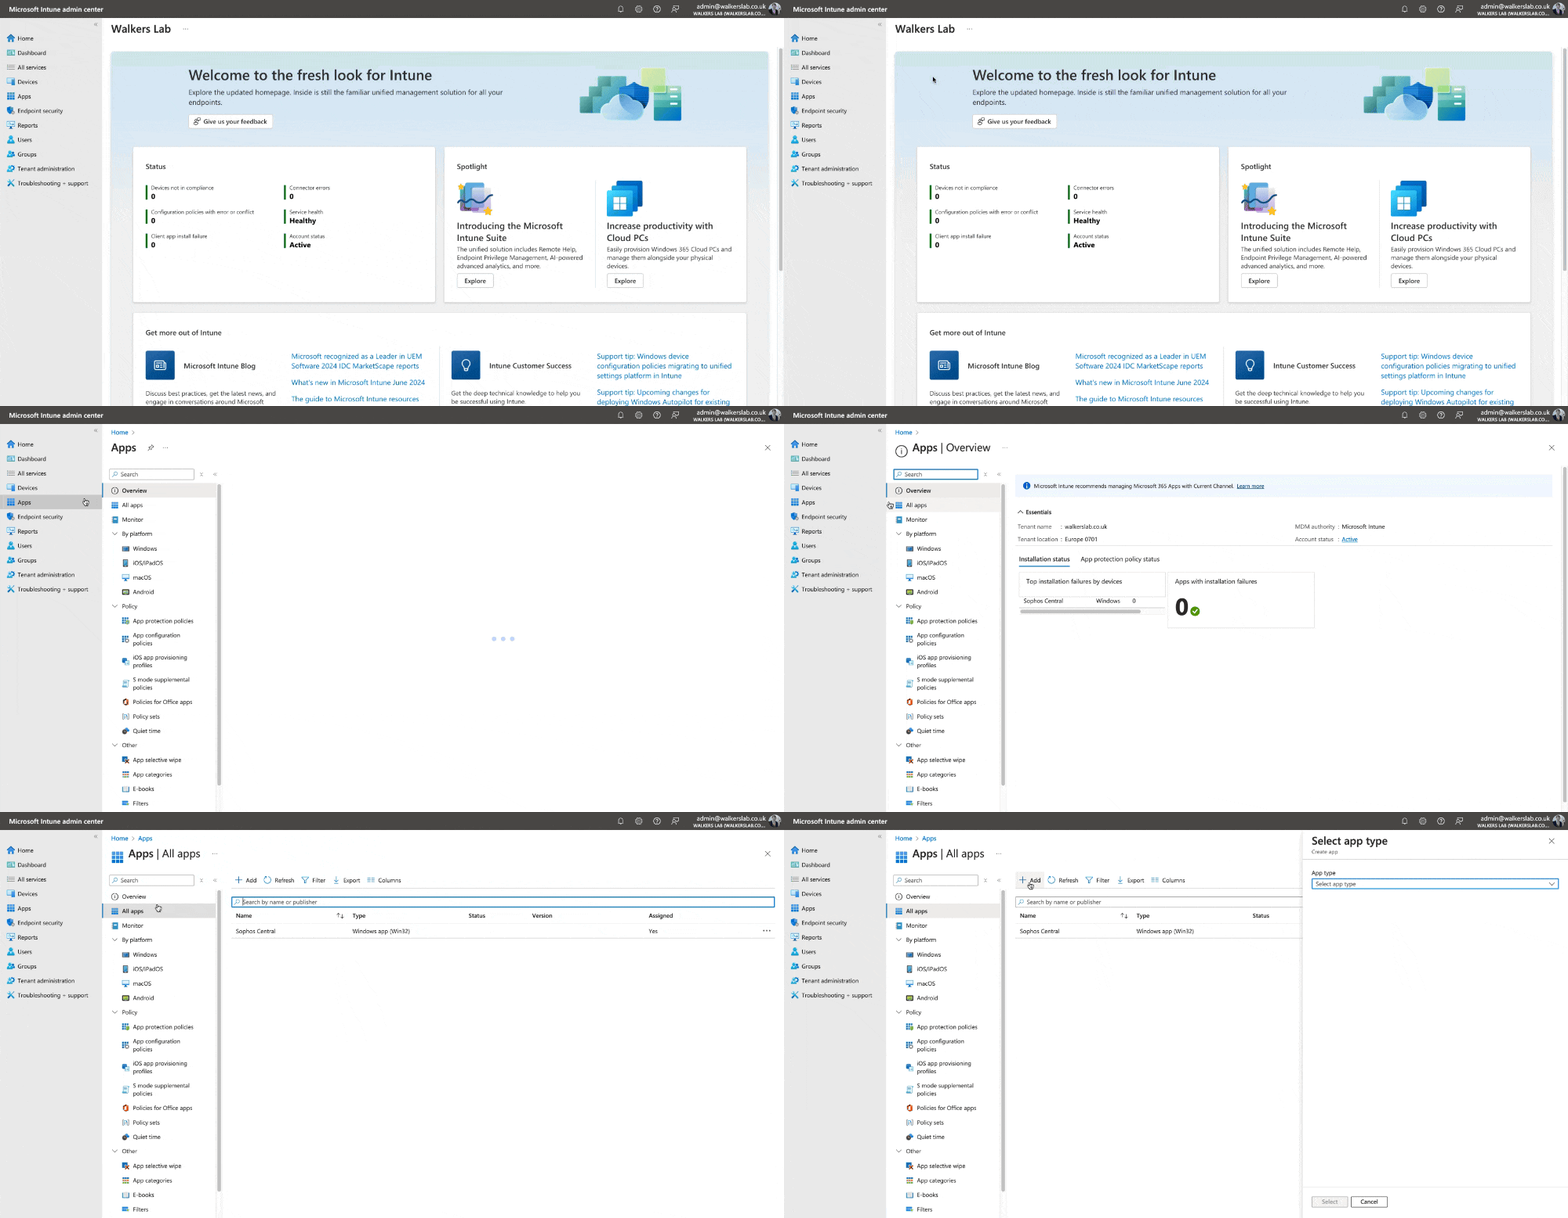
Return to the Intune admin center and click on Apps > All apps > Add.

For the app type, select “Windows app (Win32)” from the dropdown list then click on “Select”.

Click “Select app package file“.

Click on the browse icon and find the .intunewin file in the output folder you created earlier then click “Ok“.

Fill out the required fields with the relevant information then click “Next“.
| Name | VMware Tools |
| Description | VMware Tools is a suite of utilities that enhances the performance of the virtual machines guest operating system and improves management of the virtual machine. |
| Publisher | VMware Inc |
| App Version | 12.4.5 |
| Privacy URL | https://www.broadcom.com/privacy |

On this page we will be specifying the install/uninstall behaviour. Fill out the fields with the following information:
| Install command | VMware-tools-12.4.0-23259341-x86_64.exe /s /v “/qn REBOOT=R ADDLOCAL=ALL |
| Uninstall command | MsiExec.exe /x {1FF5D624-5515-4343-837A-E54C101573E6} /qn REBOOT=R |
| Installation time required | 30 |
The install command will need the name of the VMware Tools setup .exe file you downloaded earlier. If the name if the setup file is different, make sure you change this in the install command.
You can find more information about the install command arguments here: https://docs.vmware.com/en/VMware-Tools/12.4.0/com.vmware.vsphere.vmwaretools.doc/GUID-E45C572D-6448-410F-BFA2-F729F2CDA8AC.html
Once you have filled out all the required fields, click “Next“.

On the requirements page you’ll need to specify the “Operating system architecture” and “Minimum operating system”. In my example I have chosen 64-Bit as the architecture and Windows 10 1909 as the minimum OS.
After filling out the required fields, click “Next”.

On the detection rules page you’ll want to click on the dropdown menu and choose “Manually configure detection rules“. Click on “Add” then a side menu will open up. File out the fields with the following information:
| Rule type | File |
| Path | %ProgramFiles%\VMWare\VMWare Tools\ |
| File or folder | vmtoolsd.exe |
| Detection method | File or folder exists |
| Associated with a 32-bit app on 64-bit clients | No |

You can skip the Dependencies and Supersedence pages.
For the assignment we will select the dynamic group we created earlier. Click on “Add group” then search for your group in the search bar. Select the dynamic group we created earlier then click “Select” then “Next“.

On the final page review all the information and click “Create“.

Verifying the deployment
You can verify the application has been deployed successfully to a device by viewing one of your virtual machine devices.
Navigate to Devices > All Devices > [Device Name] > Managed Apps
Here you should see the application and the installation status.

